This wolf drawing easy peasy step by step tutorial will walk you through how to draw a wolf and even includes a free printable pdf that is perfect for beginners.
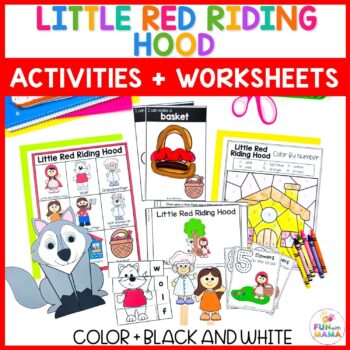
RELATED: Little Red Riding Hood Activities For Kids

How to Draw A Wolf
Learning how to draw a wolf can get a bit overwhelming when you look at it as a whole drawing. But if you break it up into step-by-step strokes, as we do in our learn to draw series, you’ll see how to easily draw a wolf without feeling overwhelmed.
Whether you are telling the story of Three Little Pigs, Little Red Riding Hood, or just have a love for drawing, we’ve got you covered.
You can find links to our favorite drawing supplies here.
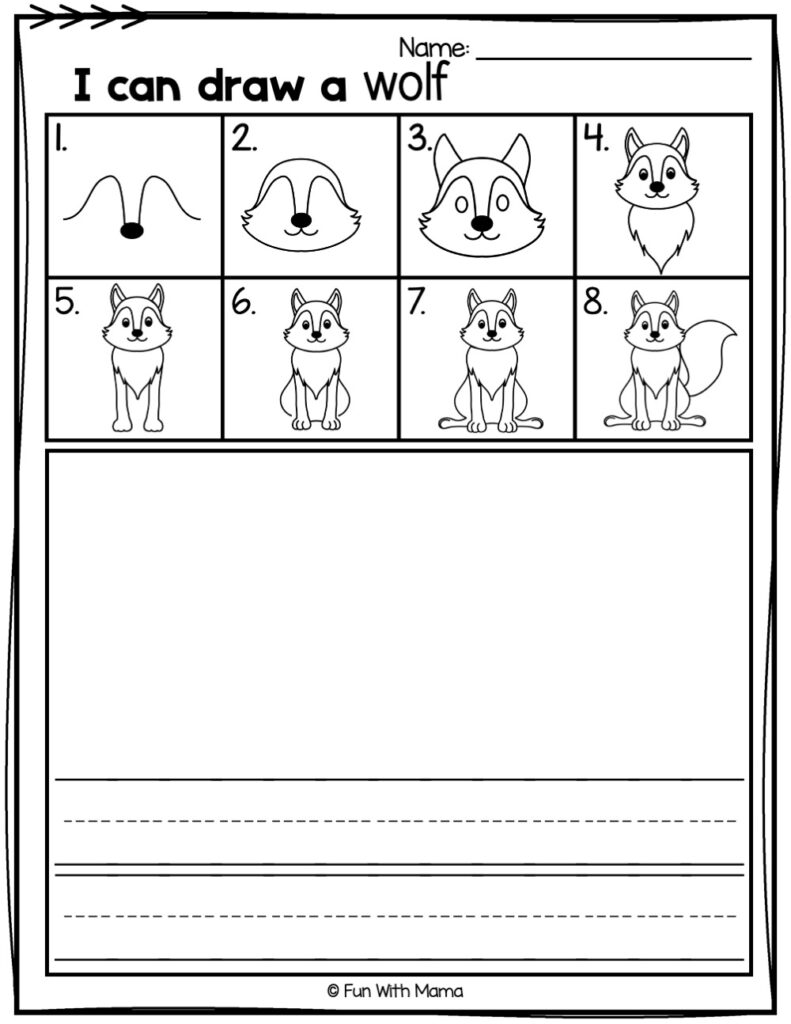
Please note that the printable version does not have a step-by-step tutorial with words, which you may prefer. You can find the free printable in high quality by clicking the button at the bottom of this blog post.
Wolf Drawing Video
Okay, who’s ready to start the drawing of a wolf with me? Let’s get started!
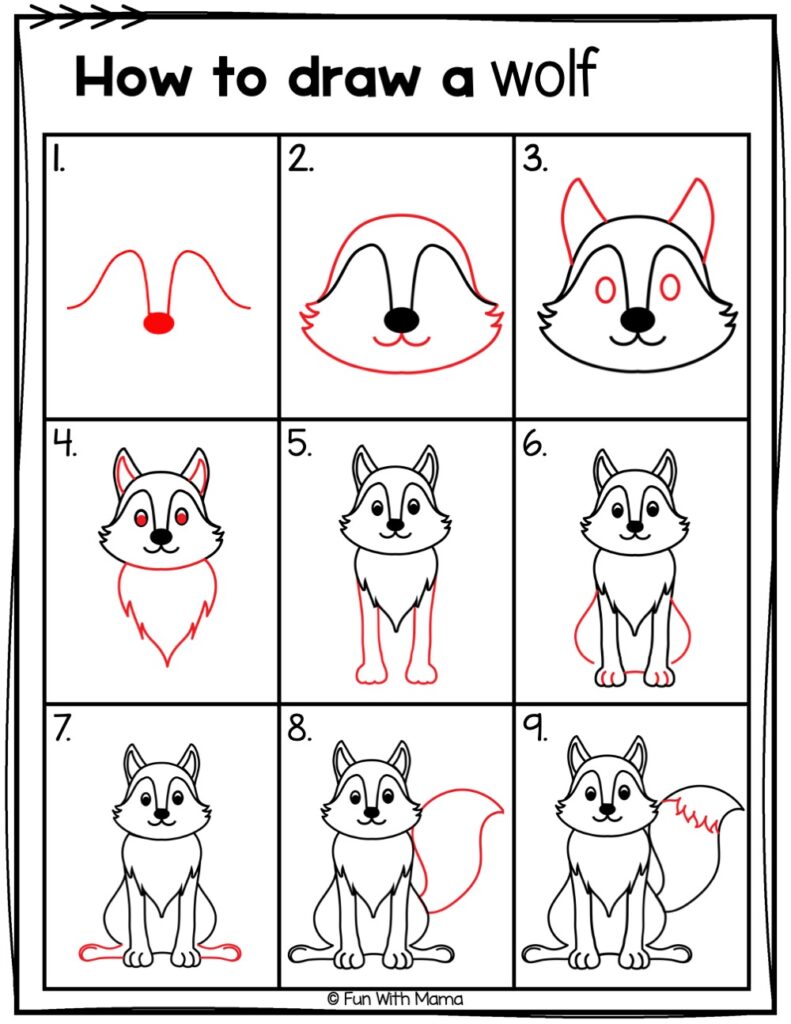
How To Draw A Wolf Steps
This step-by-step guide will break down the wolf drawing process. Grab a pen or pencil, and get ready to sketch. You can also grab an eraser if that makes you feel more comfortable.
Let’s start with the head step.
Step One: Wolf’s nose and face
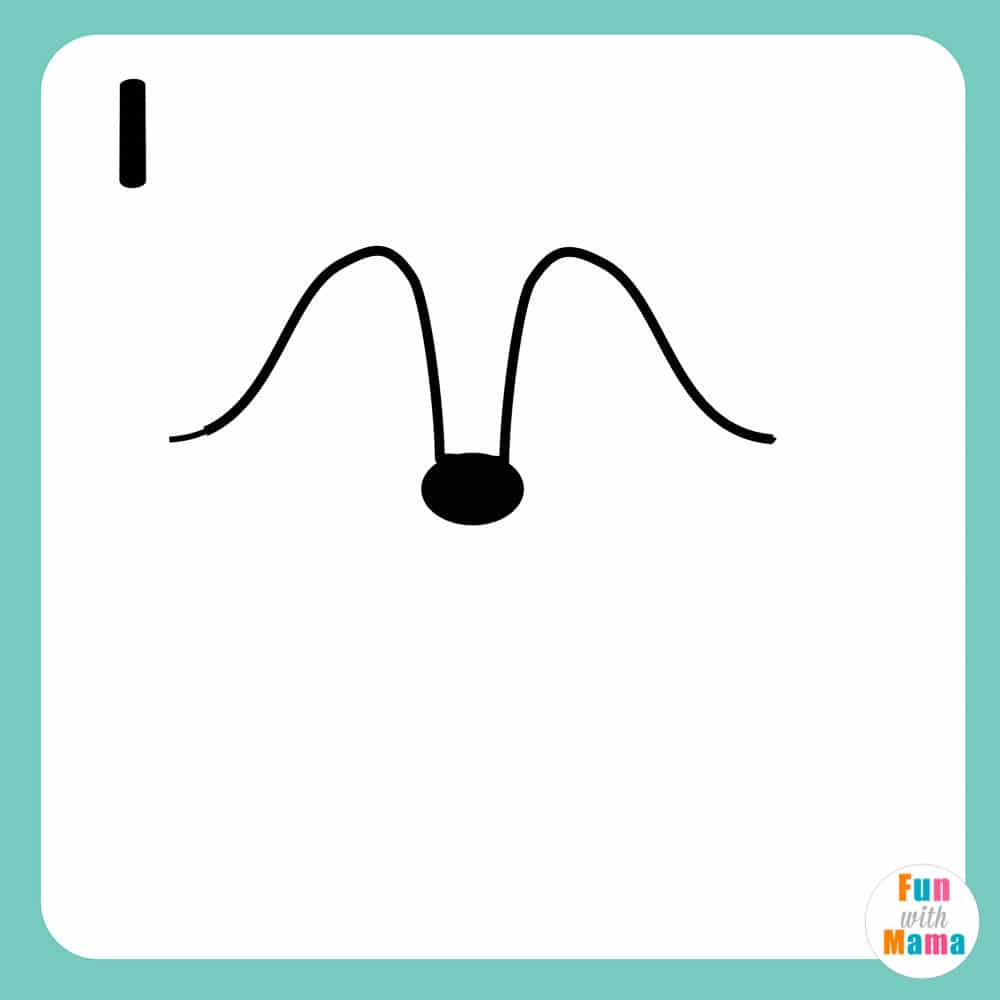
We will be starting off by drawing an oval shape for the wolf’s nose. Once your child has drawn the oval shape, allow them to color in the nose with some crayons.
Now, does your child remember how a slide looks? I’m sure they do – it’s almost every little child’s favorite part of going to the park! We will be drawing a slide-looking line to the left and right of the wolf’s nose. Don’t forget to make the bottom of the line a bit curved! This part of the step forms part of the face of the wolf, which we will be completing in the next step.
Now that you’ve drawn the snout let’s work on the wolf’s facial features.
Step Two: Complete the wolf’s face
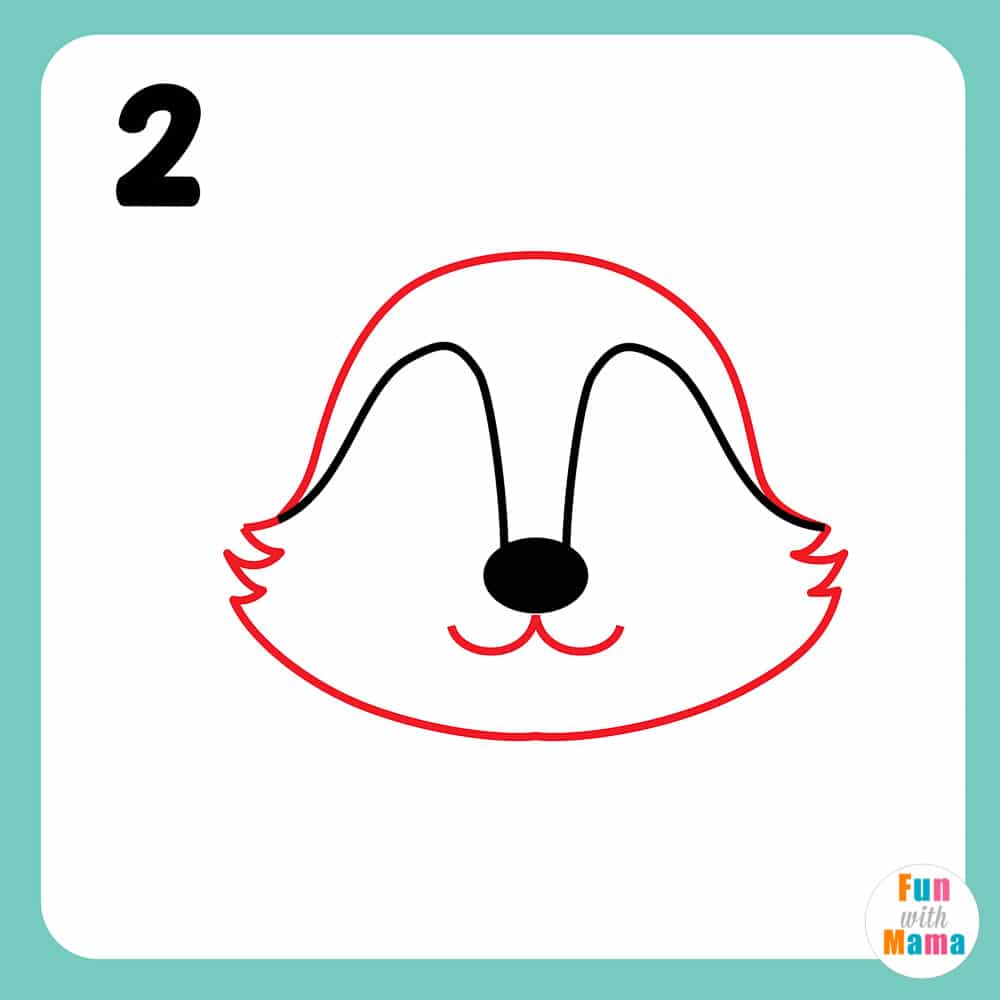
Our wolf is no ordinary animal and has a detailed face, so we will be taking quite some time in this step. But don’t worry, just follow along with me and you will have no problem creating the wolf’s facial features.
Let’s start off by drawing a wide upside down U-shape at the top of the slide-looking line that we drew in the previous step. This will be the wolf’s head. Make sure that the bottom of the U is curved and ends at the end of the curve of our slide-looking line.
Now, draw sharp zig-zagged lines on the right and left side of the wolf’s face. You should have three sharped points.
Next, we will join the sharp points on either side of the face by drawing a wide curved line at the bottom.
Okay, we are almost done with this step, but let’s give our wolf a mouth. This can be done by drawing two wavy lines at the bottom of our wolf’s nose.
Look – our wolf seems to have a very smiley mouth, just like the wolf in Little Red Riding Hood! You can add a bottom lip if you want it to appear like the wolf is smiling or laughing more.
Step Three: Wolf’s eyes and ears
Our drawing seems to be coming together, but there are a few facial features missing. Can your child guess what it is? Yes – the wolf still needs some eyes and ears!
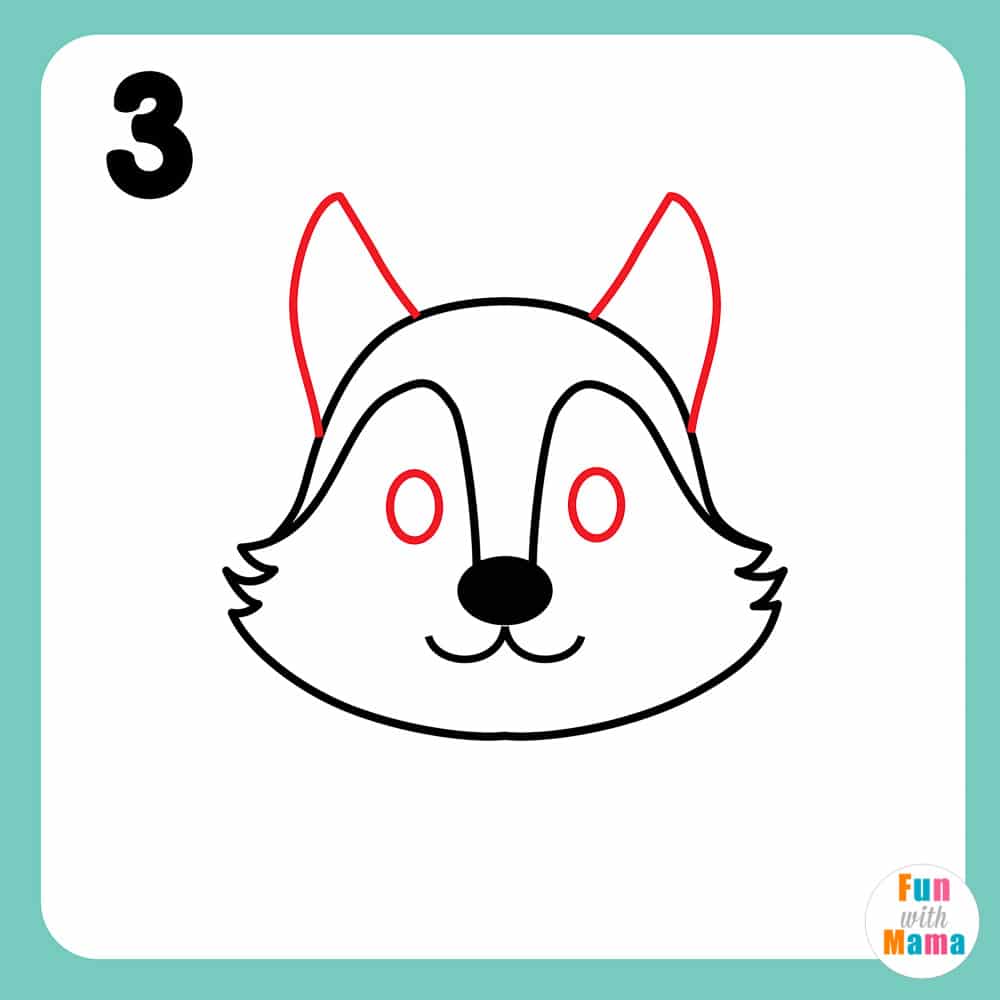
Draw two long ovals for the eyes and two triangular-shaped pointed ears at the top of the wolf’s head.
Step four: Some facial detail and the wolf’s body
Let’s add some detail to the wolf’s eyes and ears that we just drew.
Draw two smaller long ovals into the eyes and color it in. Oooh, the wolf seems to be staring at us now!
Next, draw another pointed triangular shape into the wolf’s ears. We have now completed the face of our wolf.
Okay, let’s give the wolf some fur now. Draw a curve going down from the left of the wolf’s face. Then, draw 2 wide zig zagged lines inwards that continue till you reach the halfway point of the wolf’s face. Do the same on the right side of the wolf’s face. The bottom of the fur should come together to form a “V”.
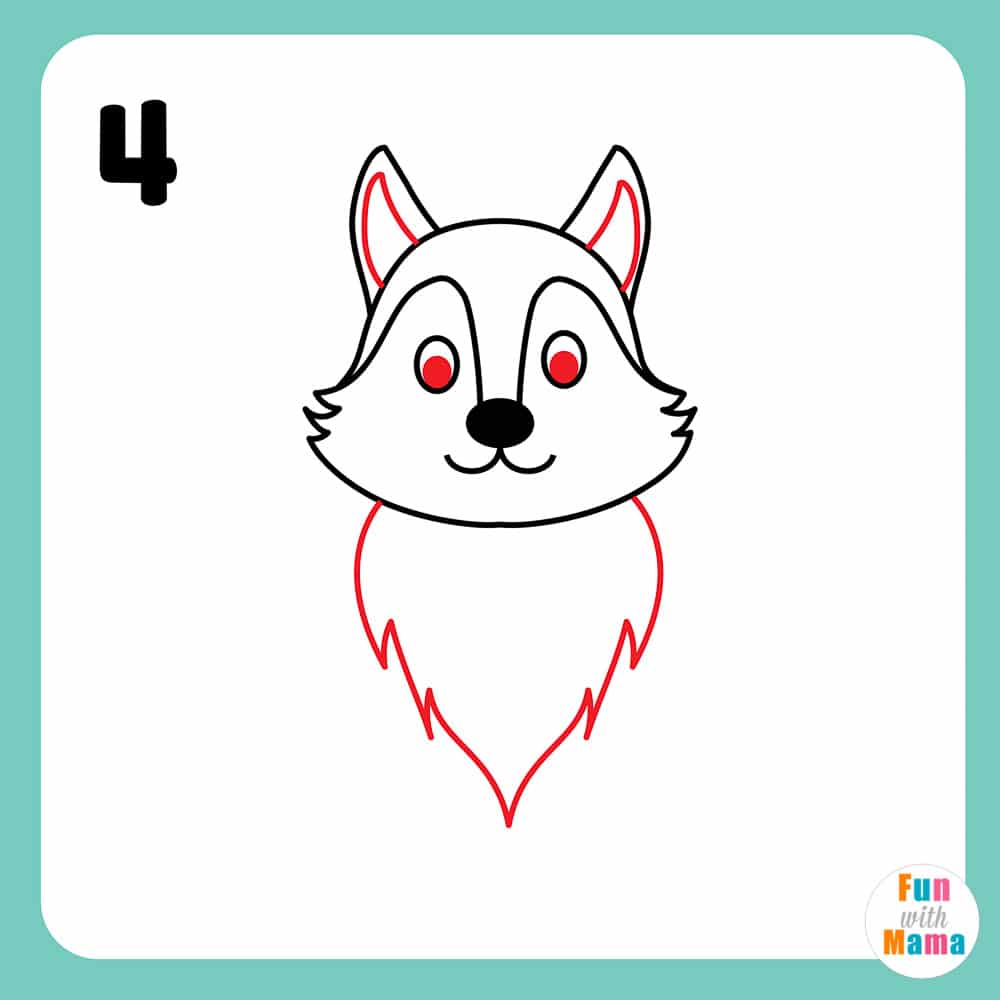
Step 5: Wolf’s legs
Our wolf needs some leg’s too!
From the left side of the wolf’s fur, draw two vertical lines parallel to each other. Curve each line at the bottom towards each other. Join the remaining space by drawing a little wave forming a paw. Repeat this step on the right side of the wolf’s fur.
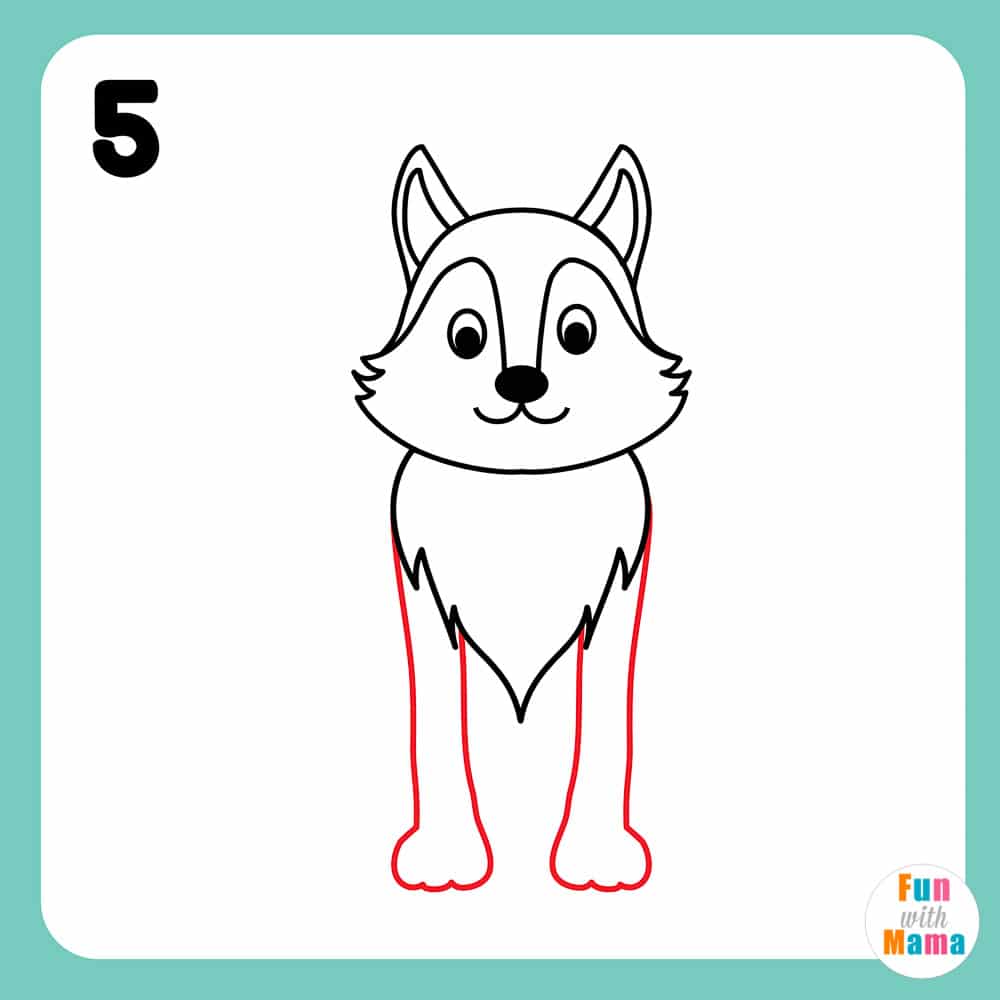
Step 6: Wolf’s body
We will now draw the body of our wolf. Draw a curve from the first zig-zagged edge to the bottom just above the wolf’s paw on the left side of the wolf’s fur. Repeat this step on the right of the wolf’s fur, but start your curve just below the zig-zagged edge.
Did your child notice that little space between the wolf’s two paws? Draw a little curved line in between that space to give the body a fuller look.
Let’s add some detail to the wolf’s paw too! At the point of the wave on the wolf’s paw, draw small vertical curves facing each other (just as we did in the picture below).
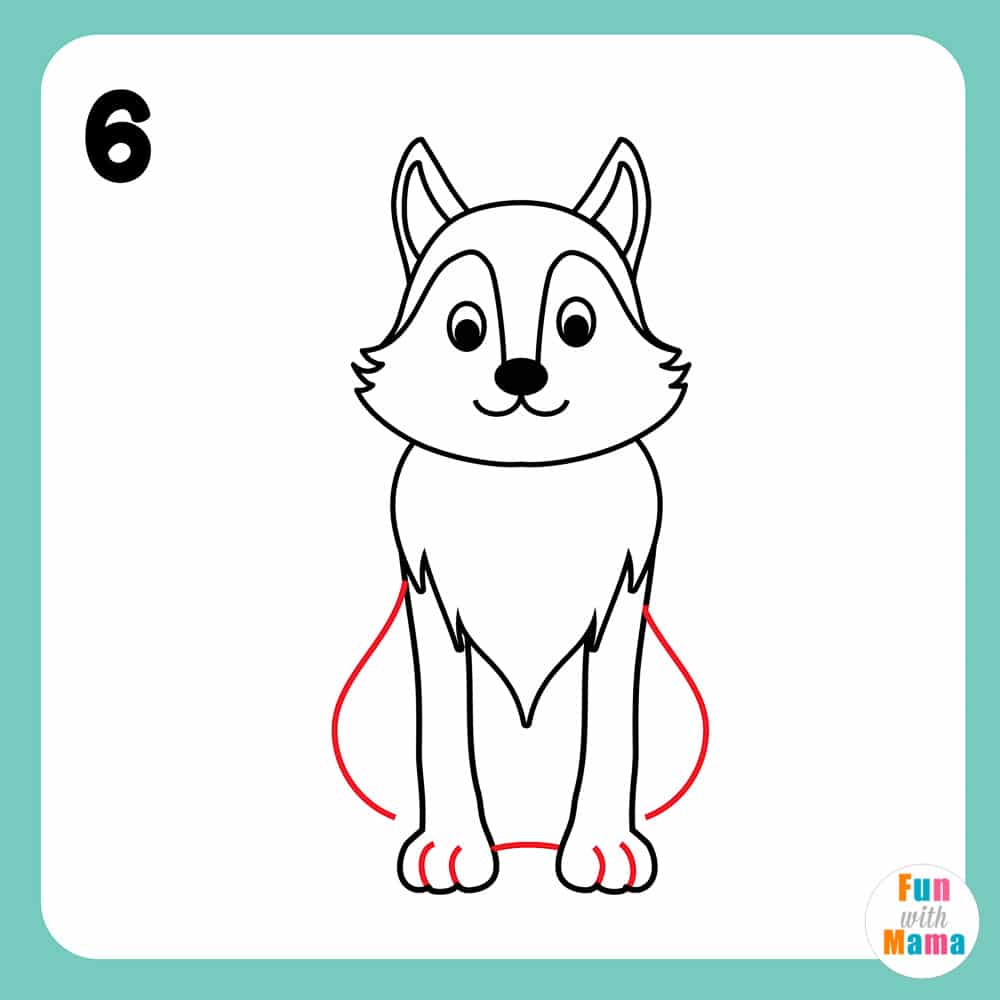
Step 7: Wolf’s legs
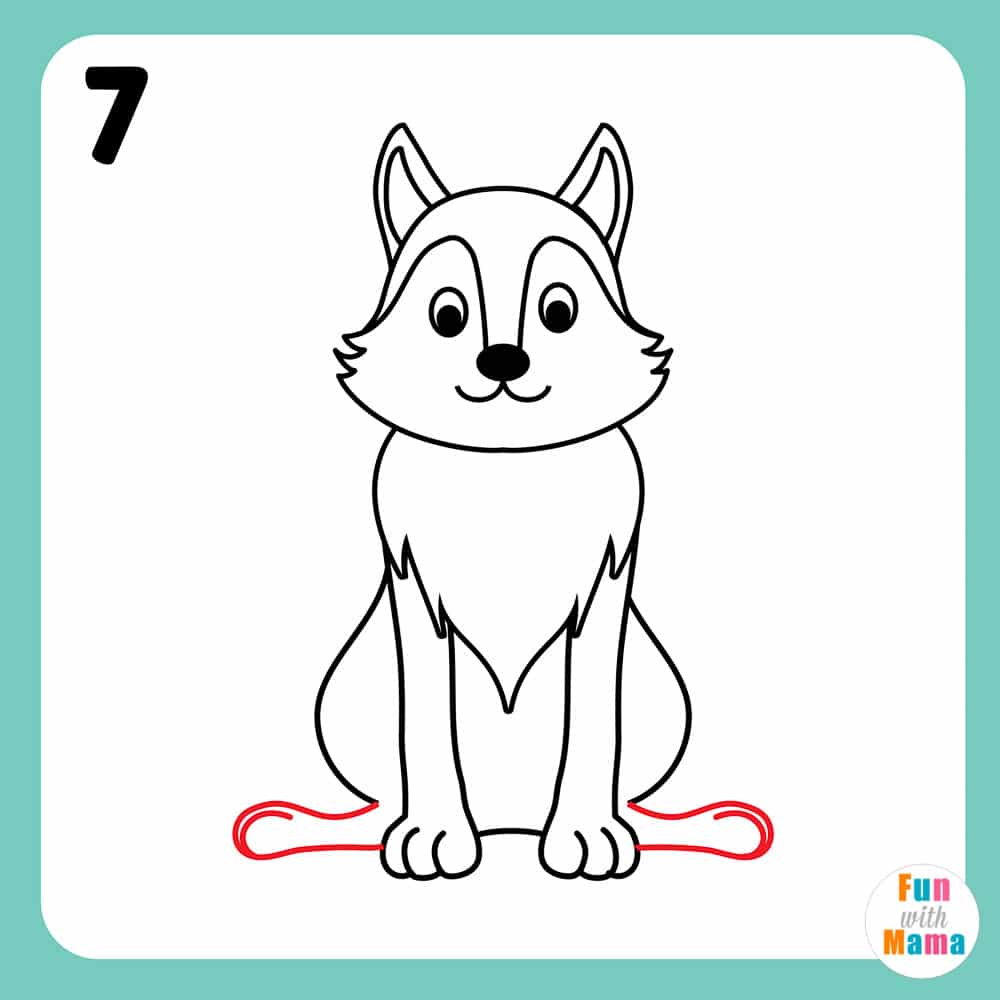
Has your child noticed that our wolf only has two legs so far? In this step we will complete drawing the remaining legs of our wolf. In the previous step we left space to add a hind leg on each side (or rather, the feet.)
Draw a very wide U-shape coming out from the bottom of the wolf’s body. Now, round the edge and draw a horizontal line reaching the paw of the wolf. Repeat this step on the other side of the wolf’s body.
Let’s add a bit of detail to the legs that we just drew, by drawing another rounded curve near the edge of the curved part of each leg.
Yay! Our wolf now has four legs and appears to be sitting. Maybe he is sitting and thinking of his next sneaky way to trick people… what does your child think?
Step 8: Wolf’s tail
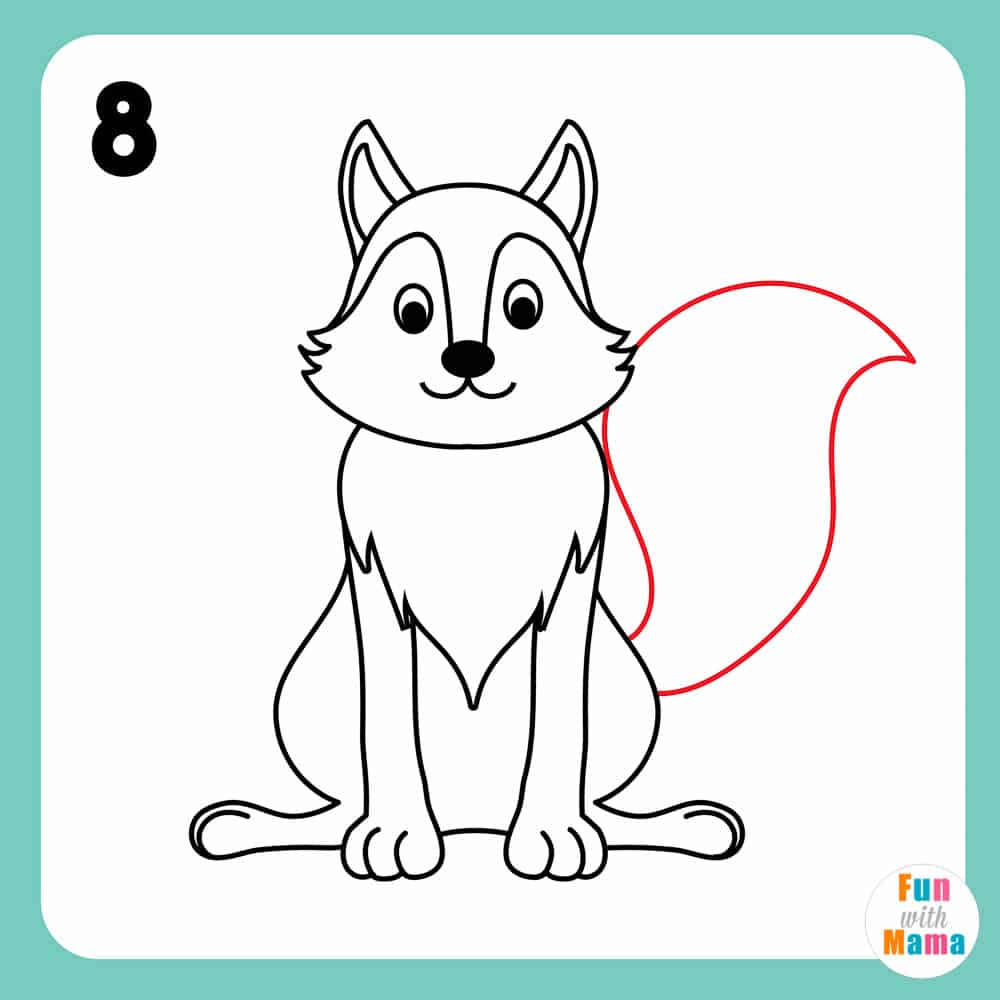
We are almost complete with our drawing and all that’s left to do is to give our wolf a tail.
Draw a large curved line on the right side of the wolf’s face going towards the space that you have next to the wolf. Try to make the curve as wide as possible. At the end of the curve, draw a wavy line ending at the halfway point of the wolf’s body. Complete the tail by drawing a curved line in the remaining space, extending from the wolf’s face, touching his fur and ending at the body.
Step 9: Add tail details
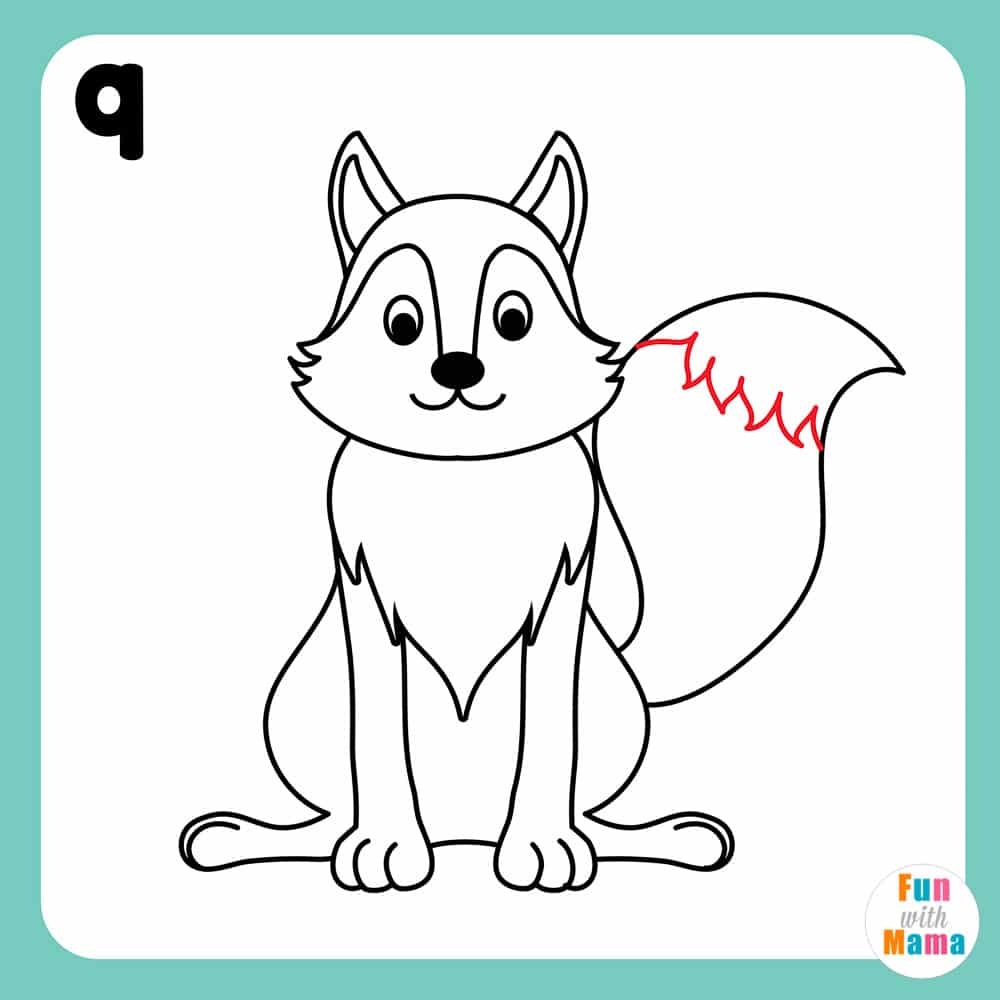
To completely finish off our drawing, let’s add a little bit of detail to the tail by drawing some zig zagged lines at the top of the tail from either ends of the tail.
Our wolf drawing is now complete! This is just a simple outline buy they can add more wolf steps if they’d like! Adding in shadows, fine lines, lips and nostrils, or even a chin on the front view are all options. They can even try to add long legs and have this wolf standing as well!
One other fun thing is to add a moon as a smaller circle at the top!
You can even make fur lines if they’re feeling even more creative.
What did you think of this easy wolf drawing tutorial?
Get the free How To Draw A Wolf printable here
I have a freebie for you. I have included this easy to draw wolf in a printable PDF for your convenience. It includes the easy wolf drawing steps and a blank space for you to try drawing a wolf too.
Extend Learning with these Little Red Riding Hood Activities
GET THE LITTLE RED RIDING HOOD ACTIVITY PACK HERE
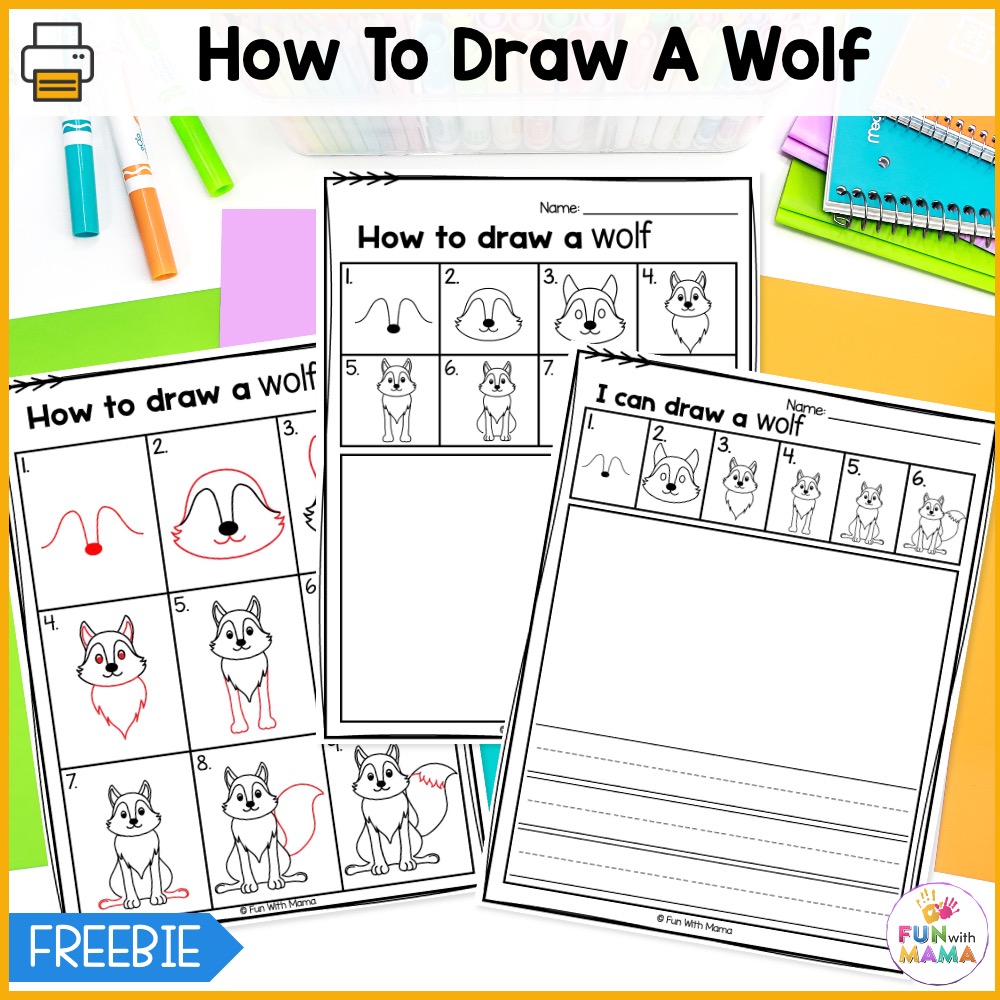
When you’re done, color it in.
Take it further and try to draw a realistic wolf or learn how to draw a spider.
More Learn To Draw Posts
WHERE TO GET THE LEARN TO DRAW PACK
GET THE LEARN TO DRAW ACTIVITY PACK HERE

Wow, your child has learned how to draw a wolf now! At least the next time they listen to you reading about a wolf in a fairy tale, they can proudly say that they know how to draw one!
If your child would like to color in their wolf, then allow them the opportunity to and if they would like to add a background to the picture, a forest could be a good option. Allow your child the opportunity to express their inner creativity. You’d be surprised at how imaginative and creative these little ones can be!
Save this easy drawing tutorial for any time you need a quick and easy drawing activity!

Get easy and instant access to ALL of our printable activities and resources by joining the Fun With Mama printables club.
More Wolf Video Tutorials


Leave a Comment